
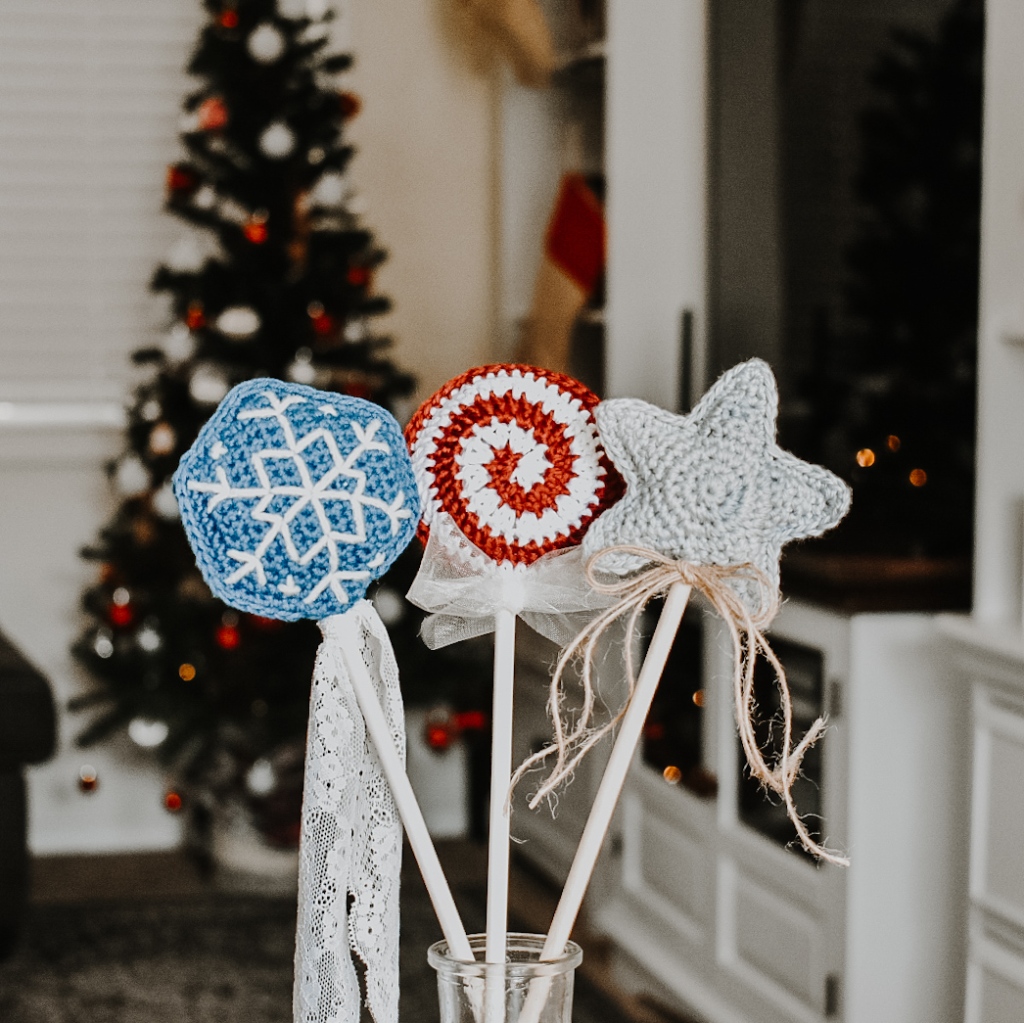
The final and my personal favorite of the Winter Wonder Wand collection is the Snowflake Wand!
One of the most magical things about winter is snow! The clean and calm that follows the snow is a welcome break from the busier summer months. I know for me and for my children that all of the fun that comes with snowfall are cherished memories. Getting bundled up to build snowmen, make snow angels, hit your sibling in the face with snowball…all magical moments for a lot of childhoods and magical moments need a magic wand!
This is most intricate of the wands with it’s embroidered snowflake detail but don’t worry! I am going to walk you through each step I used to create the snowflake with written explanations and pictures. I can’t wait for you to make this!
What you’ll need:
- Approximately 20 yards of DK/light weight yarn in main color.
- Approximately 8 yards of worsted/medium weight yarn in contrasting color.
(Pattern designed in Paintbox Yarns Cotton DK in . Affiliate link to yarn: Love Crafts)
- E/3.5 mm hook or size needed to obtain gauge.
- Scissors
- Small tapestry needle
- .25″X12″ dowel rod
- Glue gun and sticks
- Fiber Fill Stuffing
Pattern Info:
Gauge: sc – 11 sts by 13 rows = 2″X2″ unblocked
Gauge is important to your project so your finished piece will be the size specified in the pattern and the materials specified in the pattern will be sufficient. The hook size for the pattern is based on what I used, but gauge can vary from person to person and be affected by yarn. If it takes you fewer rows/stitches to make 2”, try using a smaller size hook; if more, try a larger size hook.
Notes:
- Beginning chains do not count as stitches.
- Snowflake is created by crocheting two pieces, embroidering a snowflake on the RS and then crocheting them together.
- Pattern has all shapes in written instructions with a picture tutorial for embroidery and assembly.
- Finished snowflake is 3″ wide and 3.5″ tall, wand is 12.5″ long with stick handle.
Stitches and Abbreviations (US Terms):
ch(s) – chain(s)
st(s) – stitch(es)
sl st – slip stitch
sc – single crochet
sc2tog – single crochet two together
rep – repeat
WS – wrong side
RS – right side
Pattern:
With main color:
Make 2.
Ch 8.
Row 1: 2 sc in 2nd ch from hook, sc next 5 chs, 2 sc last ch. (9)
Row 2: Ch 1, turn, 2 sc in first st, sc in next 7 sts, 2 sc in last st. (11)
Row 3: Ch 1, turn, sc each st across. (11)
Row 4: Ch 1, turn, 2 sc first st, sc next 9 sts, 2 sc in last st. (13)
Row 5: Ch 1, turn, sc each st across. (13)
Row 6: Ch 1, turn, 2 sc first st, sc next 11 sts, 2 sc in last st. (15)
Row 7: Ch 1, turn, sc each st across. (15)
Row 8: Ch 1, turn, 2 sc first st, sc next 13 sts, 2 sc in last st. (17)
Row 9: Ch 1, turn, 2 sc first st, sc next 15 sts, 2 sc in last st. (19)
Row 10: Ch 1, turn, sc each st across. (19)
Row 11: Ch 1, turn, sc each st across. (19)
Row 12: Ch 1, turn, sc2tog first 2 sts, sc next 15 sts, sc2tog last 2 sts. (17)
Row 13: Ch 1, turn, sc2tog first 2 sts, sc next 13 sts, sc2tog last 2 sts. (15)
Row 14: Ch 1, turn, sc each st across. (15)
Row 15: Ch 1, turn, sc2tog first 2 sts, sc next 11 sts, sc2tog last 2 sts. (13)
Row 16: Ch 1, turn, sc each st across. (13)
Row 17: Ch 1, turn, sc2tog first 2 sts, sc next 9 sts, sc2tog last 2 sts. (11)
Row 18: Ch 1, turn, sc each st across. (11)
Row 19: Ch 1, turn, sc2tog first 2 sts, sc next 7 sts, sc2tog last 2 sts. (9)
Fasten off.
Embroidery:
With contrasting worsted weight yarn:


Assembly:
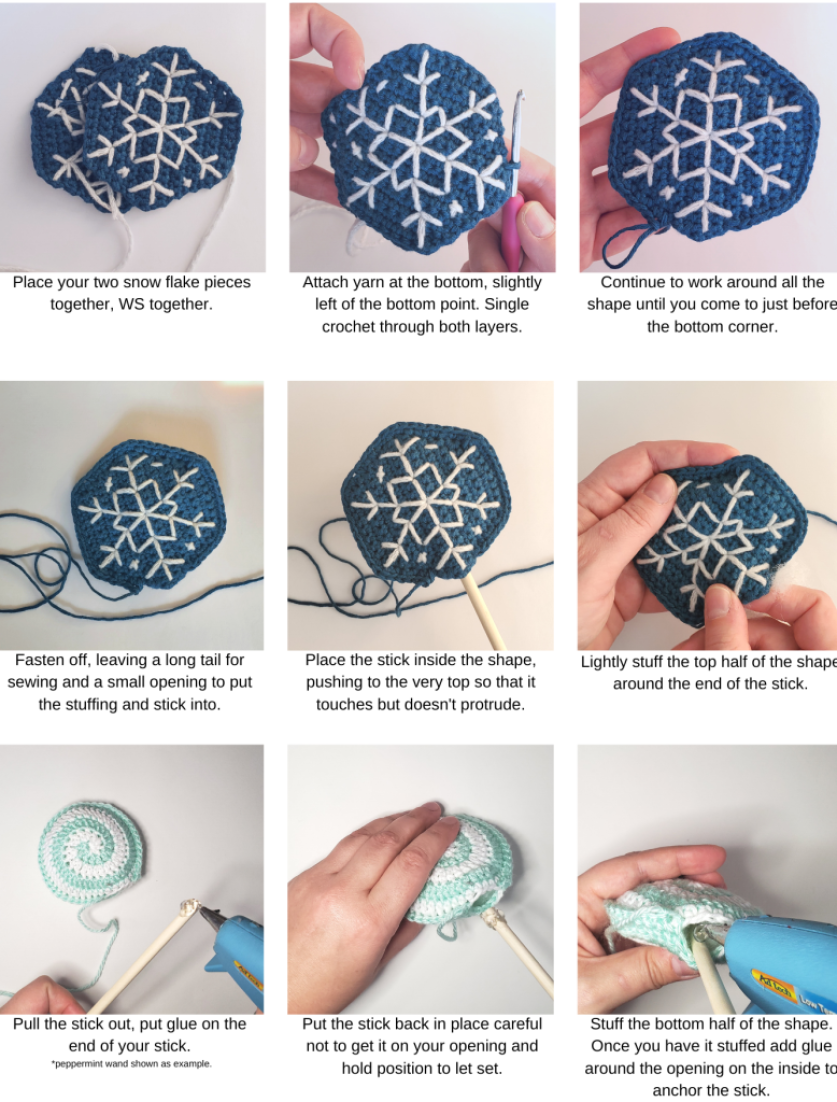
Finishing:
Take your tail you left and sew the hole shut around the stick.
Weave in ends.
Decorate your stick with ribbons or yarn. I like to tie it in a knot and then also glue it into place against the crocheted topper.
Enjoy your new wand!
Want this pattern without having to visit the blog? You can get the whole collection in PDF format from my Etsy or Ravelry.


7 Favorite Snowflake Patterns - On Needles And Hooks
January 21, 2021 at 12:16 pm[…] […]